Monday, May 28, 2007

Assignment 7, Composition

This assignment taught us all about the rule of thirds when shooting. My tendency before when taking a pic, was to place my main subject in the middle of the frame...thus making them the middle of the pic. What I learned in this assignment is to use the rule of thirds. Imagine there is a grid on your frame (like tic-tac-toe). Where the 4 lines meet (top 1/3 corner right and left, bottom 1/3 corner right and left) is where you want to place your main subject. It is more pleasing to the eye this way, as you will see in my photos. However, when doing portraits, of course you want your subject centered.....so you want to place your subjects eyes in the top third center of the frame. Also, most people have the tendency to shoot in horizontal position...but sometimes flipping the camera to the side and taking the pic in vertical position can bring a whole new perspective to your photo. I really loved taking these pics! I hope you enjoy. I'm including the 2 I submitted....and of course, you know I have some others that didn't make it in.


Flag Before
Flag After
Using the Rule of Thirds, I reframed the flag in the upper left corner and flipped the camera to vertical. That way I got more of the landscape behind.


Tractor Before


Tractor After
Reframed the tractor in the lower right third of the frame. I really liked this shot, it reminds me a lot of Utah....especially West Weber!


City Hall Annex Before

Although this is a beautiful shot of the building, I wanted to focus more on the water fountain.

Water Fountain at City Hall Annex. I flipped the camera on the vertical and came in closer for the shot of the fountain. This way you are also able to see the beautiful sculptures on the facia.

Above: Tractor Before

Below: Tractor After

I really love how the field pops in these pics. Another reminiscent shot of West Weber. I thought the dust plume behind the tractor was pretty cool!

Sunday, May 20, 2007

More Pics from our trip up to Frye Mesa Dam

On our trip up to Frye Mesa Dam, I went a little camera crazy and took over 100 pics. Here are a few of my favorites!


Overlooking the spillway at the Dam

Waterfall that fills Frye Mesa Dam

Reflection of the sky in the reservoir. If you look closely you can see the ripples from where the fish were jumping. This place is a fishermans dream! Just ask my brother!

Family pic from the top of the Mesa. This overlooks Pima to the left, Thatcher in the center, and Safford to the right. I used the timer on my camera to shoot this pic, and it was quite interesting to get the picture set, push the button, and scramble my way up on the boulder to get into the pic before the camera went off....I was also trying to get the girls to smile at the camera and not look at me, thus, the open mouth expression.

Looking back at the road up to Frye Mesa. We were only about 1/2 way up at this point.

The long road up to Frye Mesa. I loved the simplicity of this shot. This was the beginning of the road before we hit the twists and turns.

Another pic of the spillway up at Frye Mesa. Jared was holding onto the back of my pants to keep me from falling off the cliff edge. But, I'd say the pic was worth it!

Assignment 6 - White Balance


For this assignment, we had to use White Balance to determine the "temperature" of our final picture. White Balance serves almost the same purpose in digital SLRS as filters do in film cameras. We had to submit 2 sets of pictures with different white balances applied to the photograph. I had a difficult time choosing which pics to submit...I had so many favorites, so I will post the before and after of the 2 I decided to submit, and the afters of all the rest that I didn't submit, but really liked.


Lizard Before: Shot with Daylight WB Lizard After: Cloudy White Balance

I wanted the colors to POP a little more and

also wanted to show the contrast of the lizard and the rocks a little better. By changing the white balance to cloudy, I was able to warm the final picture up a little more.

Jay and Ainslee at Mesa Dam Before: Daylight White Balance


Jay and Ainslee at Mesa Dam After: Cloudy White Balance


Again, I wanted to show the warm colors of the mountainside, by changing the wb to cloudy I was able to do that.

The following pics are the ones I also considered submitting for this assignment, but didn't. All pics I submitted were taken during our day trip to Mesa Dam....a beautiful dam up on top of a Mesa in the middle of nowhere! We took the girls up, went for a short hike, and I of course got a ton of pictures! In fact, I may submit more miscellaneous just from that trip, I took over 100 pics while we were up there! Isn't digital film wonderful!

Monday, May 14, 2007

Assignment 5, Exposure

This week we learned about exposure lock. Our assignment was to shoot a subject in the bright sun, under a lamp, or in front of a big window. We then had to compensate for the underexposure, or overexposure by adjusting the exposure on the camera, or by using the exposure lock function. The exposure lock function allows you to focus the camera on a certain subject, lock the exposure at that, then reframe your subject to take the desired pic. For instance, in the first pic of Ainslee, she looked really washed out, so I pointed the camera at her pudgy, cute little arm, locked my exposure, reframed her cute little face, and retook the photo. Thus I got the after result. With the flowering Yucca bushes, I wanted to capture not only the cool bushes, but also the amazingly blue sky in the background. When I took the first pic, the blue of the sky wasn't as crisp, so I pointed the camera at the sandy ground, locked my exposure, reframed the bushes, and Wala! This assignment was very challenging for me, and it took a lot of tries for me to get the results I wanted, but it was very fun, and I learned a lot! Now I'm not so afraid of taking pictures in the bright beautiful sun!

BEFORE
AFTER
BEFORE
AFTER


Wednesday, May 9, 2007

Assignment 4 Fun with ISO!!!!

Our assignment this week was "shoot a purple sky at dusk". We were supposed to shoot in low light situations to see how manipulating ISO could change a pic. I learned 2 very important lessons among others this week. First, when shooting in low light situations ALWAYS have a tripod. Normally, in low light situations, the shutter speed decreases in order to allow more light in, the longer the shutter takes to close, the more likely you are to get a blurry picture if the camera is moved at all during that time, so thus the need for a tripod. Second, if you don't have a tripod available, adjust your ISO setting so that the shutter speed increases. Doing this you don't have to worry about camera shake as much, but on the flip side, with increase of ISO also comes "Noise" or grain.

Ideally I would've gotten a sunset pic and a pic with city lights, but here in remote Safford, a picture op of city lights is pretty non-existant. So the 2 sunset pics it is. I'm including the before and after pics so you can see the difference between using a high ISO and a low ISO.

Discovery Park Observatory in the sunset. I decided to only add the low ISO pic of this one.


Silhouette with a low ISO (if you look at the mountain range, you can see a silhouette of a face lying down)


Silhouette High ISO (see the grain!)


Wednesday, May 2, 2007

Other Pics

As I'm shooting pictures for these assignments, I take A LOT of pics. I then go back to my computer, choose my 2 "best," and submit them. These are some of the other pics that didn't make it in as my assignment pics, but I still liked them.


Assignment 3

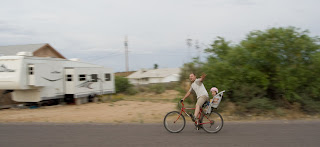
For this assignment we had to shoot in AP mode and SP mode. We also had to attempt a panning shot. Panning is a technique where you shoot a moving object and make the moving object in focus and the static background blurry. Jay sure got his workout while being my subject! It was fun though and my teacher really liked the effect I got with the bike pic.


Assignment 2

For Assignment 2 we were instructed to take pics of kids or pets......needless to say, Rhees was my favorite subject matter! After taking the pics in RAW format on the camera, we had to load them on the computer and save them in a JPEG format....then resave and resave and resave (10 times). This was to see the different capabilities of shooting in different file formats and also to see how when you save a JPEG file multiple times you experience "loss" and the pic quality changes each time.


Assignment 1

For my first assignment we had to shoot color.....and since Arizona was looking pretty deserty at the time, I chose to shoot the color that I'm most familiar with....the girls toys. Every pic was completely manual settings, and we had to adjust the settings to get the pics we wanted....I learned a lot about manipulating the camera with aperature, shutter speed, and ISO in order to take a pic without using a flash....in fact all the pics I post are "flashless".